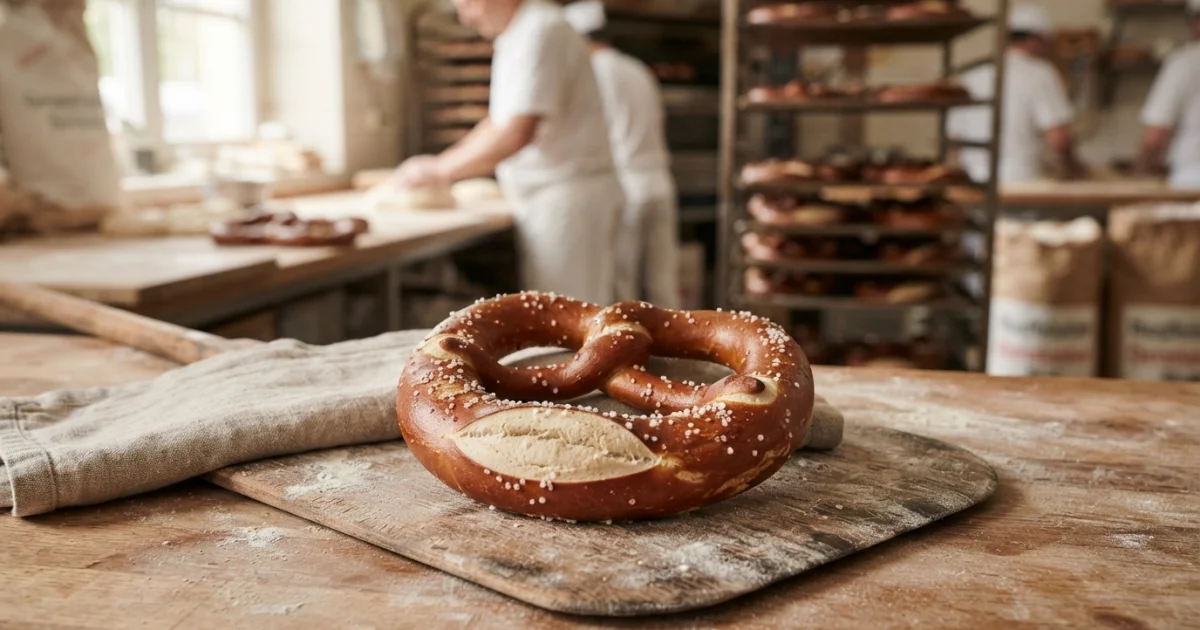
Stand outside a master bakery in Munich or Stuttgart just past dawn, and you will smell it before you hear the clatter of baking trays: a warm, mineral scent carrying notes of toasted cereal, brown butter, and an unmistakably sharp, alkaline tang. A true German Laugenbrezel is a study in contrasts. Its paper-thin skin gleams like polished mahogany, micro-blistered from high heat, while the interior offers a snow-white, tightly knit crumb that yields with a dense, satisfying chew. Replicating this bakery benchmark at home does not require professional ovens, but it demands uncompromising chemical precision. The pale, pillowy, sugar-glazed knots found in shopping malls bear little resemblance to authentic German baking. To cross that threshold, you must abandon baking soda washes and master the cold alkaline lye dip.
The Anatomy and Heritage of the Laugenbrezel
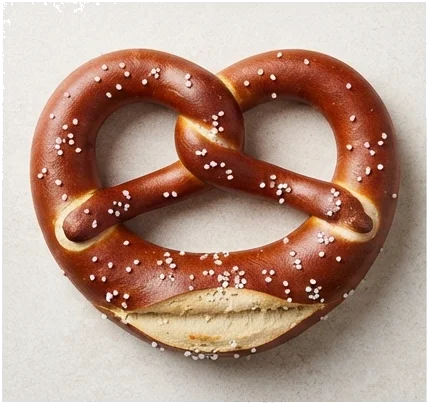
The identity of the pastry is locked inside its German compound name: Lauge, referring specifically to a caustic alkaline lye solution, and Brezel, derived from the Latin brachium, or "arms," folded in quiet prayer. For centuries across southern Germany, Austria, and Alsace, the pretzel has stood as the proud emblem of the baker's guild. Historical records often trace its iconic form to monks crafting scrap dough for pious students, though local folklore in Bad Urach credits an imprisoned baker tasked by a local count to bake a loaf through which the sun could shine three times. Just like exploring the culinary history of apple strudel, examining the pretzel reveals how deeply southern German and Austrian baking traditions shaped European food culture.
The transatlantic divergence between European bakery craft and mass-market commercial baking occurred during industrialization. In North America, the caustic hazard of bulk lye was largely swapped for hot baths of mild sodium bicarbonate (baking soda). While this substitution eliminated workshop handling protocols, it radically altered the bread's physical makeup. Commercial American pretzels evolved toward high hydration, elevated sugar levels, and soft, puffed breadiness. The authentic German Laugenbrezel, conversely, preserved its ancient craft profile: lean, incredibly stiff dough, zero added table sugar, and an aggressive, instantaneous chemical cure in cold sodium hydroxide prior to baking.
Regional Styles: Bavarian vs. Swabian Pretzels and Traditional Fats
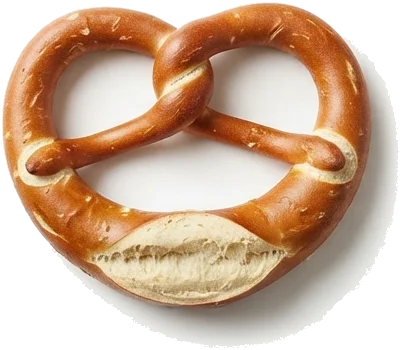
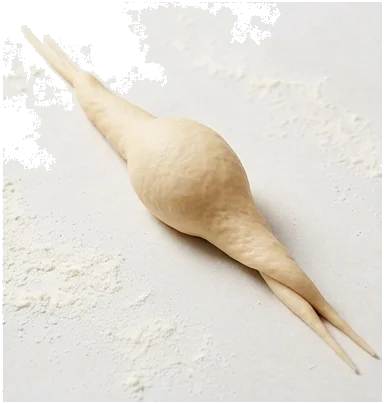
Cross the border between Bavaria and Baden-Württemberg, and you will encounter an enduring regional debate regarding silhouette and structural fat. The Swabian style (Schwäbische Brezel) is distinguished by pronounced physical contrast. It features thin, dry, remarkably crunchy intertwined arms and an exceptionally plump, slash-rent central "belly" (Bauch). To achieve this, the baker purposely concentrates the dough volume in the center while rolling the lateral ends into pencil-thin tapers. Bavarian pretzels (Bayrische Brezen), on the other hand, showcase a more democratic architecture: the loop maintains a relatively uniform, stout thickness throughout, yielding a soft, pillowy crumb across both the belly and the intertwined arms, traditionally baked without a deep expansion slash.
The underlying fat matrix also governs regional tenderness. Historically, traditional Swabian and Bavarian bakers relied strictly on clarified pork lard (Schmalz). Lard coats the gluten strands exceptionally well, producing a brittle, shattering crust while maintaining fine structural moisture in the crumb without imparting overt dairy sweetness. Modern commercial bakeries frequently substitute high-fat unsalted butter (82% butterfat) for lard to accommodate vegetarian diets. While butter introduces delicate sweet cream aromatics and a pale golden hue to the interior crumb, traditionalists will note that lard delivers the crisper arm-snap and a cleaner, savory foundation for malt.
The Chemistry of the Lye Bath: Real Lye vs. Baking Soda
The transformative magic of the Laugenbrezel is fundamentally an exercise in high-pH chemical physics. Sodium bicarbonate (standard household baking soda) possesses a relatively weak alkaline pH hovering around 8 to 9. Even boiling baking soda or baking it beforehand to yield sodium carbonate caps out near a pH of 10 to 11. Conversely, a standard food-grade sodium hydroxide solution (true lye) registers at an uncompromising pH of 13 to 14. This alkaline intensity completely redefines how heat acts upon dough surface carbohydrates and proteins.
When the cold dough contacts this high-alkaline medium, the sodium hydroxide instantly hydrolyzes and breaks down surface gluten proteins into peptides and free amino acids, while simultaneously gelatinizing starches on the dough exterior. Once loaded into a blazing 450°F (230°C) oven, this surface chemical rearrangement acts as an accelerator for the Maillard reaction. Rather than relying on slow caramelization, the alkaline surface supercharges browning long before the interior crumb over-bakes or dries out.
The chemical bath also reacts with heat and atmospheric carbon dioxide to form harmless sodium carbonate on the crust, leaving behind no dangerous caustic residue. Baking soda solutions, while safe and straightforward, cannot achieve this complete chemical alteration. Instead of a blistered, thin, eggshell-crisp mahogany skin and deep mineral-bitter resonance, baking soda leaves behind an uneven, dull golden-brown surface, a rubbery exterior chew, and a lingering, metallic aftertaste that masks the malted grain.
Essential Ingredients & Baker's Formulas
Authentic pretzel dough is notoriously dry and dense, built upon low hydration percentages that would cause open-crumb sourdough enthusiasts anxiety. The target dough hydration sits strictly between 50% and 52%. This low water content prevents structural collapse during handling and ensures the pretzel retains its defined knot without slouching or ballooning in the oven.
Precision selection of raw ingredients ensures correct texture and enzymatic performance:
- Flour: Unbleached European Type 550 or premium unbleached all-purpose flour (approx. 11.5% protein). Avoid high-protein bread flours, which introduce excessive gluten elasticity, causing the rolled dough to snap back relentlessly during shaping.
- Diastatic Barley Malt Powder: The non-negotiable core of German bread craft. Active diastatic enzymes break down complex flour starches into simple sugars, actively feeding the yeast while supplying the distinct malted back-palate and deep mahogany crust coloration.
- Liquid: Chilled water, held around 50°F (10°C). Cold hydration keeps yeast propagation suppressed during extended mechanical kneading, avoiding early dough swelling before shaping.
- Fat: Room-temperature unsalted European butter or traditional rendered leaf lard (Schmalz).
- Yeast & Salt: Clean active dry or fresh baker's yeast paired with non-iodized fine sea salt.
Formula Breakdown: Pre-Dough (Vorteig) and Main Dough Ratios
Utilizing an overnight preferment (Vorteig) develops the organic acids and enzyme activity required for crumb resilience, allowing the dough to maintain tension through the lye bath. Below is the precise metric formulation scaled for 8 standard Swabian-style pretzels.
| Dough Component | Ingredient | Baker's % | Weight (Grams) |
|---|---|---|---|
| Preferment (Vorteig) | All-Purpose / T550 Flour | 20% | 100 g |
| Preferment (Vorteig) | Cold Water (10°C / 50°F) | 12% | 60 g |
| Preferment (Vorteig) | Active Dry Yeast (or 15g Sourdough Starter) | 0.4% | 2 g |
| Main Dough | All-Purpose / T550 Flour | 80% | 400 g |
| Main Dough | Diastatic Barley Malt Powder | 3% | 15 g |
| Main Dough | Fine Sea Salt | 2% | 10 g |
| Main Dough | Active Dry Yeast (or 10g Fresh Yeast) | 0.8% | 4 g |
| Main Dough | Unsalted Butter or Traditional Lard | 3% | 15 g |
| Main Dough | Ice-Cold Water (10°C / 50°F) | 40% | 200 g |
Total flour across stages equals 500g with a combined hydration of 52% (260g water total). This low hydration intentionally yields a stiff, resistant dough mass; resist the temptation to add extra water during the mixing phase.
Critical Safety Protocol: Handling Food-Grade Lye (Sodium Hydroxide)
Working with pure food-grade sodium hydroxide (NaOH) demands the same procedural discipline as laboratory chemistry. In dry bead form and concentrated solution, lye is caustic and causes chemical burns on exposed skin and irreversible corneal damage upon eye contact. Handled correctly, however, it is entirely safe and manageable in a domestic kitchen.
Prior to opening your container of sodium hydroxide, prepare your workstation with mandatory personal protective equipment: heavy chemical-resistant nitrile gloves, tight-fitting splash-proof safety goggles, and full-length protective sleeves. Keep curious children and pets entirely clear of the prep area.
Bowl material selection is critical: Use only heavy food-grade stainless steel, high-density polyethylene (HDPE), or thick heat-resistant laboratory glassware. Never allow lye to contact aluminum, copper, zinc, non-stick coatings, or cheap thin plastics. Aluminum reacts violently with sodium hydroxide in an aggressive, exothermic reaction that releases highly flammable hydrogen gas while ruining your mixing vessel.
Memorize the golden chemical directive: ALWAYS add lye beads to water; NEVER add water to lye. Pouring water onto dry chemical beads can trigger a sudden thermal surge, causing the bottom liquid to boil flash-hot and eject caustic drops across your counters. Work over the sink basin. Measure cold water (around 68°F / 20°C) into your stainless steel bowl, then gently pour in the dry chemical beads.
The dilution target is non-negotiable: A 4% lye solution. Measure exactly 40 grams of food-grade sodium hydroxide pellets and dissolve them slowly into 1,000 milliliters (or grams) of cold tap water. Stir calmly with a stainless steel spoon or slotted skimmer until the liquid runs perfectly clear. Never measure chemical lye using volumetric teaspoons or measuring cups; sodium hydroxide must be weighed using an accurate digital scale.
Step-by-Step Production Method
Crafting authentic pretzels requires controlled timing across three distinct environmental phases: the mechanical mixing and gluten alignment, an uncovered refrigeration rest to develop a structural exterior skin, and the brief chemical bath followed by high-heat baking.
Phase 1: Fermentation Schedule and Kneading
Prepare the preferment the evening prior to baking. Stir together 100 grams of flour, 60 milliliters of cold water, and 2 grams of active dry yeast until a dense dough forms. Seal the container and let it sit at room temperature for 1 hour to kickstart enzyme fermentation, then transfer it to the refrigerator (around 40°F / 4°C) to mature for 12 to 14 hours.
The following morning, pull the cold Vorteig and tear it into chunks directly inside the bowl of a heavy-duty stand mixer. Add the remaining 400 grams of flour, 15 grams of diastatic malt powder, 10 grams of fine salt, 4 grams of active yeast, 15 grams of softened butter or lard, and 200 milliliters of ice-cold water. Fit the mixer with the dough hook attachment.
Run the mixer on low speed for 4 minutes to incorporate the stiff ingredients without overheating the motor. Once loose flour vanishes, increase the mixer speed to medium-high and knead for a full 5 to 6 minutes. The final dough must pull away completely cleanly from the bowl walls, resulting in a smooth, resilient, remarkably firm mass with an internal temperature reading roughly 75°F (24°C). Cover the bowl and let the dough rest on your work surface for just 20 minutes to relax gluten tension before division.
Phase 2: Shaping the Traditional Swabian Knot
Divide the firm dough mass into 7 to 8 equal portions, weighing approximately 90 to 100 grams each. Keep the unworked dough portions loosely covered with a damp cloth to prevent early drying.
To roll the classic Swabian shape, do not flour your wooden or composite work surface; the stiff dough requires friction against the board to roll efficiently. Press a dough portion into a flat rectangle, roll it tightly into a short cylinder, and begin rolling it outward from the center using both open hands. Keep your hand pressure focused on the middle section while expanding your hands outward toward the perimeter.
You need to create a tapered strand measuring 24 to 28 inches (60 to 70 centimeters) in length. The central portion—the "belly"—must remain thick and bulbous, roughly 1.5 inches (4 centimeters) in diameter, while the extended arms taper smoothly to pencil-thin ends with small, rounded tips. Form the dough strand into an open U-shape with the fat belly facing directly toward your chest and the tapered arms extending away from you. Pick up both ends, cross the arms over one another in the air, cross them a second time to execute a double twist, and gently fold the ends back down toward your body. Press the tips firmly onto the belly at the 4 o'clock and 8 o'clock positions, ensuring they adhere without flattening the core.
Phase 3: Proofing, Skin Formation, and the Cold Chill
Transfer the shaped pretzels onto baking sheets lined with heavy-duty baking parchment, leaving adequate space between them. Allow the pretzels to proof uncovered at room temperature for roughly 45 to 60 minutes until they expand by roughly 50 to 70 percent in size. They must not double completely, or the dough will become fragile and collapse under dipping.
Now execute the crucial, non-negotiable bakery step: Place the proofed pretzels, completely uncovered, into the refrigerator (or freezer) for 45 to 60 minutes prior to dipping.
This rapid chilling step achieves two critical structural goals. First, it cools the dough fat and stabilizes the gluten network, allowing you to lift and handle the raw pretzel without distorting its symmetry. Second, the cold moving air dries the wet dough exterior, generating a taut, leathery "skin." This skin acts as a barrier, preventing the pretzel from absorbing excess caustic liquid during the dip, which would otherwise leave you with a soggy, structurally compromised pretzel.
Phase 4: Dipping, Scoring the Belly, and High-Heat Baking
Preheat your oven to 450°F (230°C) using conventional top and bottom heat. Avoid using convection (fan) mode if possible, as strong air currents can prematurely dry the moist alkaline sheen before the crust finishes expanding.
Put on your nitrile gloves, apron, and protective eye goggles. Set your stainless steel bowl containing the 4% cold lye solution alongside the chilled baking sheets. Prepare your heavy baking trays lined with premium, thick baking parchment (cheap, thin baking paper can stick aggressively to lye-dipped dough; silicone baking mats should be avoided as they insulate the base, preventing deep bottom-crust development).
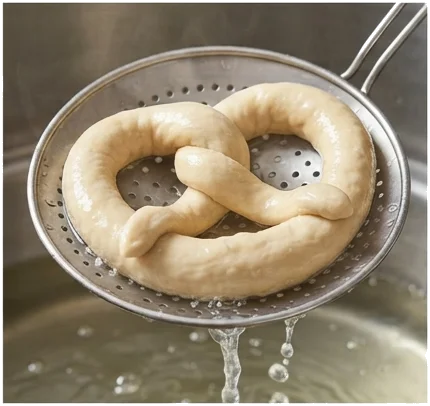
Working individually, lift a cold, firm pretzel by its thick base and lower it gently into the lye bath. Submerge the dough for strictly 4 to 5 seconds (up to 10 seconds only if working with slow, acidic sourdough pretzeldoughs). Using a stainless steel perforated skimmer, lift the pretzel out, hold it over the bath for 3 seconds to let excess liquid drain back into the bowl, and place it gently back onto your lined baking sheet.
Working quickly while the surface is wet, use an ultra-sharp razor blade or curved baker's lame held at a shallow 45-degree angle to make a clean, horizontal slash across the thickest section of the belly. The cut should penetrate the skin roughly 5 millimeters deep. Immediately sprinkle coarse, non-melting pretzel salt across the scored center, keeping the thin arms largely free of salt. Slide the trays onto the center oven racks and bake for 12 to 14 minutes. Watch the color evolve rapidly from ivory to rich gold, culminating in an authentic, deep chestnut mahogany. Remove the pretzels and cool them completely on a wire rack for 10 minutes to allow the crust to set crisp.
Professional Bakery Workflow: Freezing and Make-Ahead Strategies
German village bakeries rarely mix pretzel dough from scratch at four in the morning. Instead, they rely on a cold-stabilization workflow that home bakers can easily emulate for fresh morning baking.
To implement this make-ahead schedule, roll and shape your pretzels through Phase 2. Allow them to rise at room temperature for roughly 30 minutes (reaching roughly half their final proof volume). Place the trays directly into your home freezer, completely uncovered, and freeze them hard for 12 hours. Once rock solid, transfer the unbaked pretzels into airtight freezer bags. They keep well for up to one month without loss of yeast vitality.
When ready to bake, do not thaw the dough. Set up your 4% lye bath directly on your prep counter. Remove the frozen pretzels, submerge them while still rock solid in the room-temperature lye bath for 5 seconds, transfer them to parchment-lined trays, score the bellies, apply pretzel salt, and place them straight into your preheated 450°F (230°C) oven. Simply extend your baking time by 2 to 3 minutes. The frozen core preserves the interior moisture while the lye and heat finish developing the blistered crust.
Once baking is complete, dispose of the spent lye solution safely. Sodium hydroxide is the foundational ingredient in household drain unblockers. Slowly pour the dilute 4% solution directly down your stainless steel or PVC kitchen sink drain while running plenty of cold tap water. The heavy water flow flushes the alkaline liquid cleanly away while helping dissolve grease traces in household plumbing traps. Never store diluted lye in unlabeled domestic containers or unsealed jars.
Authentic Serving Culture: Bavarian Traditions & Pairings
In authentic southern German dining culture, the pretzel is not an afterthought, a bar garnish, or a vessel for sugary cheese sauces. It is an everyday staple, eaten fresh within hours of baking. The quintessential Bavarian breakfast format is the Zweites Frühstück (second breakfast), served strictly before midday. This ritual pairs warm, fresh Laugenbrezeln with poached Weißwurst (veal and pork back-bacon sausage seasoned with parsley, lemon, and mace) served in warm water alongside a generous dollop of Süßer Senf (sweet Bavarian coarse-ground mustard).
Beyond breakfast, the classic format is the simple Butterbrezel. The cooled pretzel is sliced horizontally through the thickest section of the belly using a serrated bread knife and spread with cold, cultured, high-fat unsalted butter. In Franconian and Upper Bavarian beer gardens, you will find the pretzel served alongside Obatzda—a savory Bavarian spread crafted from ripe Camembert cheese, softened room-temperature butter, sweet paprika powder, finely minced onions, and a splash of wheat beer. Standard yellow American mustard or sweet honey mustard variations do not feature in traditional regional service; the pristine alkaline chew, butter, and malt require no aggressive condiments to make their point.
Frequently Asked Questions
Can I make authentic German Laugenbrezeln using baking soda instead of lye?
While you can produce an edible brown bread knot using a boiling water bath mixed with baking soda (sodium bicarbonate) or baked soda (sodium carbonate), it will not replicate an authentic German bakery pretzel. Baking soda caps out at a weak pH of 8 to 9, which cannot recreate the paper-thin micro-blistering, rich mahogany shine, crisp arm-snap, or distinct mineral-alkaline flavor profile produced by a cold 4% sodium hydroxide bath.
Why must the pretzel dough be chilled before dipping in the lye bath?
Chilling the shaped pretzels uncovered in the refrigerator (or freezer) for 45 to 60 minutes firms up the fat matrix and stiffens the gluten structure, preventing the pretzels from losing their shape when handled. Crucially, the cold airflow evaporates moisture from the exterior, creating a dry, taut skin that keeps the dough from soaking up excess caustic liquid during dipping.
How do I safely dispose of the lye bath after baking?
Because domestic drain cleaners are made primarily of sodium hydroxide, disposing of your spent 4% lye bath is straightforward and safe for plumbing. Slowly pour the liquid directly down your kitchen sink drain while running generous streams of cold tap water. The cold water safely neutralizes and disperses the alkaline solution while naturally clearing grease residues from domestic drains.
Can I freeze unbaked pretzels to bake fresh later?
Yes. After shaping your pretzels, allow them to proof for roughly 30 minutes, then freeze them uncovered on a baking sheet until completely solid. Store them in an airtight freezer bag for up to 30 days. When ready to bake, dip the pretzels into the 4% lye bath directly from their frozen state—do not thaw them first—score the belly, salt, and bake at 450°F (230°C), adding roughly 2 to 3 minutes to the standard baking time.
Leave a Comment